
If you’ve ever found yourself yearning for the cozy warmth that only a wood stove can provide, you’re not alone. There’s something magical about the crackling sound of burning wood and the comforting heat it radiates. Now, imagine enhancing that experience by installing a wood stove pipe yourself – a project that’s not as daunting as it may seem. In this guide, I’ll walk you through the process of How To Install A Wood Stove Pipe, from the initial setup to avoiding common pitfalls. Proper installation ensures both safety and efficiency, so let’s dive into the details of this DIY project.
Getting Started With Wood Stove Pipe Installation
Before you start the installation process, gather all the necessary tools and materials. Trust me; there’s nothing more frustrating than having to interrupt your installation because you forgot a crucial item. You’ll need a wood stove pipe kit, which typically includes pipes, elbows, a flashing kit, and a storm collar. Additionally, grab a tape measure, a level, a screwdriver, and high-temperature silicone sealant.
Choose the Right Location 🔍
Selecting the perfect spot and a plan for How To Install A Wood Stove Pipe is a critical first step. Ensure it complies with safety regulations, keeping a safe distance from combustible materials. Additionally, consider the path for the stove pipe – a straight, vertical run is ideal for optimal performance.

Selecting the Right Location:
- Begin by choosing an appropriate location for your wood stove. It should comply with local building codes and maintain the required clearances from combustible materials.
- Ensure there’s a proper foundation for the stove, whether it’s a non-combustible floor or a hearth pad.
Measure Twice, Cut Once
It’s an old adage, but it holds true in the world of wood stove pipe installation. Measure the distance from your stove to the ceiling or exterior wall carefully. Precision is key, so take your time to avoid any mishaps later on.
- Measuring and Cutting the Pipe:
- Measure the distance from the stove’s flue collar to the thimble or chimney. This measurement determines the length of the pipe you need.
- Use a hacksaw or pipe cutter to trim the pipe to the correct size. Remember, measure twice, cut once!
- Assembling the Pipe Sections:
- Connect the pipe sections according to the manufacturer’s instructions. Typically, you’ll twist the sections together, securing them with screws provided in the kit.
- Use a level to ensure that the pipe runs vertically and doesn’t compromise the stove’s performance.

Installing Wood Stove Pipe Through Wall
Installing a wood stove pipe through a wall requires careful planning and execution to maintain safety and compliance.
Find the Right Wall Penetration Point 🔍
Identifying the ideal location to penetrate the wall is crucial. Ensure it’s clear of obstructions and that you’re not interfering with any structural elements. Mark the spot on both sides of the wall for accuracy.
Locating the Wall Thimble:
- Identify the wall thimble’s location by measuring and marking it on the interior and exterior walls.
- Use a hole saw to create an opening for the thimble, ensuring it aligns perfectly with the pipe.
Now comes the fun part – drilling the hole for your wood stove pipe. Use a hole saw appropriate for the diameter of your pipe. Make sure to drill straight through to maintain a clean and efficient opening.
Install the Wall Thimble
A wall thimble acts as a protective barrier between the pipe and the wall. Secure it in place with screws, ensuring a tight fit. This prevents any heat transfer to combustible materials, keeping your home safe.
- Attaching the Pipe to the Thimble:
- Slide the pipe through the thimble and secure it in place.
- Apply high-temperature silicone sealant around the joint to prevent any leaks.
- Installing the Wall Support:
- Mount the wall support bracket to bear the weight of the pipe. It provides stability and prevents the pipe from sagging over time.

Installing Wood Stove Pipe Through Window
If you’re considering an unconventional route for your wood stove pipe, such as through a window, follow these steps:
Choose the Right Window Location 🔍
If you’re opting for a window installation, carefully select a location that allows for proper ventilation. Ideally, the window should be close to the stove and provide a clear path for the pipe.
Choosing the Window Location:
- Select a window that meets the required clearances and is feasible for installation.
- Ensure the window remains operational and doesn’t compromise safety.
Create an Opening
Carefully remove the windowpane to create a suitable opening. Remember, safety first – wear protective gear to prevent injuries from glass shards. Once the window is open, proceed to the next step.
Creating the Opening:
- Use a jigsaw or reciprocating saw to cut a precise opening in the window frame.
- Install a thimble designed for window installations to protect the combustible materials around the opening.
Secure the Pipe Through the Window Opening
Gently feed the wood stove pipe through the window opening. Ensure a snug fit and seal any gaps with appropriate sealing materials. This step is crucial to maintaining the efficiency of your wood stove and preventing drafts.
Connecting the Pipe:
- Insert the pipe through the thimble, extending it to the exterior.
- Secure the pipe and thimble with screws, applying silicone sealant to create a weatherproof seal.
Installing Wood Stove Pipe Through Roof
Installing a wood stove pipe through the roof involves additional considerations, but it’s a common and effective method.
Determine the Roof Penetration Point 🔍
Similar to wall installation, identifying the right spot to penetrate the roof is essential. Take into account the roof’s slope and any potential obstacles. Once determined, mark the spot on both the interior and exterior sides of the roof.
Locating the Roof Penetration Point:
- Identify the optimal location on the roof for the pipe penetration. It should align with the stove’s flue collar.
- Mark the spot and use a reciprocating saw to create an opening.
Safety first – use a sturdy ladder to access your roof. Once you’re up there, cut a hole through the marked spot using a reciprocating saw or a hole saw. Take your time and stay steady.
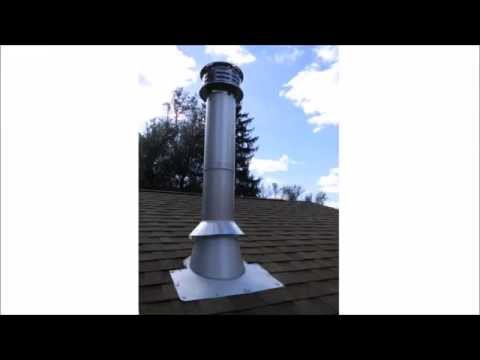
Install the Roof Flashing
A quality roof flashing is your best friend when installing a wood stove pipe through the roof. It provides a watertight seal, preventing leaks and protecting your home from the elements. Secure the flashing with screws and make sure it sits snugly around the pipe.
- Installing the Roof Flashing:
- Attach the roof flashing around the pipe penetration point. This ensures a watertight seal and prevents leaks.
- Secure the flashing with screws and apply silicone sealant to enhance the seal.
- Connecting the Pipe Sections:
- Extend the pipe through the roof, connecting additional sections as needed.
- Install a storm collar above the flashing to divert water away from the pipe.
Extra Tip: Embrace Insulation 🌡️
Consider adding insulation around your wood stove pipe to enhance its efficiency. Insulation minimizes heat loss and ensures that the warmth generated by your wood stove is effectively distributed throughout your living space. It’s a small investment that pays off in both comfort and energy savings.
Mistakes to Avoid
- Inadequate Clearances:
- Avoid placing the wood stove too close to combustible materials. Follow the manufacturer’s recommendations for clearances to prevent fire hazards.
- Poor Sealing:
- Neglecting to seal joints with high-temperature silicone can lead to air leaks and decreased efficiency. Take the time to seal every connection properly.
- Ignoring Local Codes:
- Familiarize yourself with local building codes and regulations. Ignoring these guidelines can result in fines or, worse, compromise safety.
- Neglecting Roof Flashing:
- Proper roof flashing is crucial to prevent water leaks. Don’t skip this step, as water infiltration can damage the stove and surrounding materials.
- Forgetting About Safety Gear
- Don’t compromise on safety. Wear protective gear, especially when drilling, cutting, or working at heights. Safety glasses, gloves, and a hard hat should be part of your installation ensemble.
How To Install A Wood Stove Pipe Final Thoughts

Now that you’ve reached the end of this comprehensive guide, you’re well-equipped to tackle the installation of a wood stove pipe with confidence. How To Install A Wood Stove Pipe requires careful planning, precise measurements, and adherence to safety guidelines. Whether you choose to run the pipe through a wall, window, or roof, each method demands attention to detail for a successful and secure installation.
By following this comprehensive guide and avoiding common mistakes, you’ll be enjoying the warmth of your wood stove in no time. Remember, each step is a building block towards creating a warm and inviting atmosphere in your home.


